5 Ultimate Roof Leak Repair Sealant Tips – Chimney, Metal Roof – Turbo Poly Seal

Every building has a roof that needs maintenance. All roofs need repairs, whether flashing, drains, skylights, or chimneys that cause leaks.

Turbo Poly Seal is a roof leak repair sealant designed to address all leak problems. Its unique composition consists of polyurethane and bituminous resins. Turbo Poly Seal will adhere to almost any surface. The only material it will not bond to is EPDM Rubber.

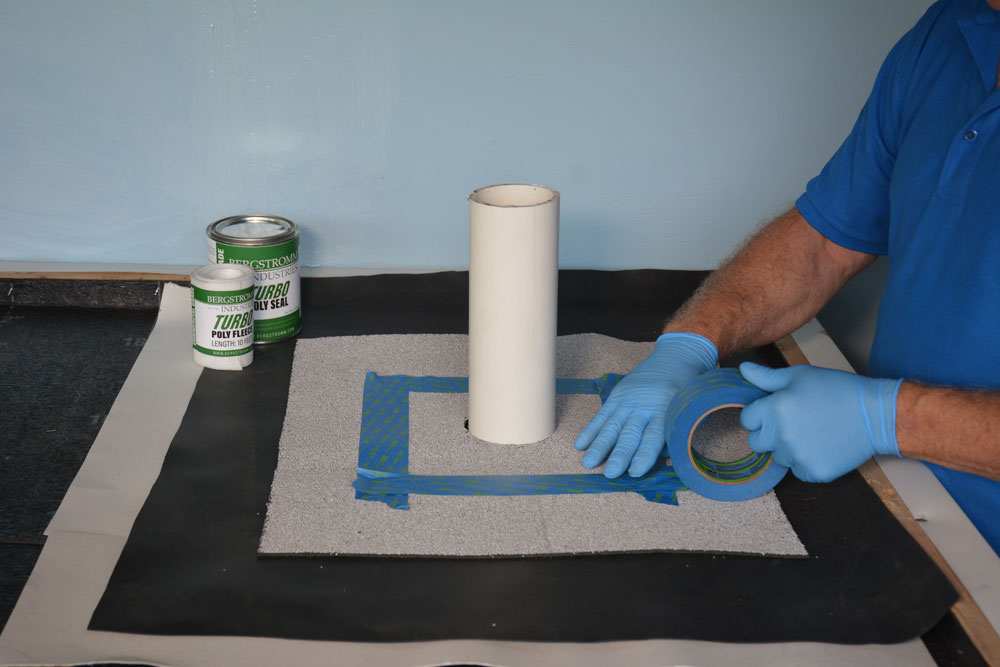
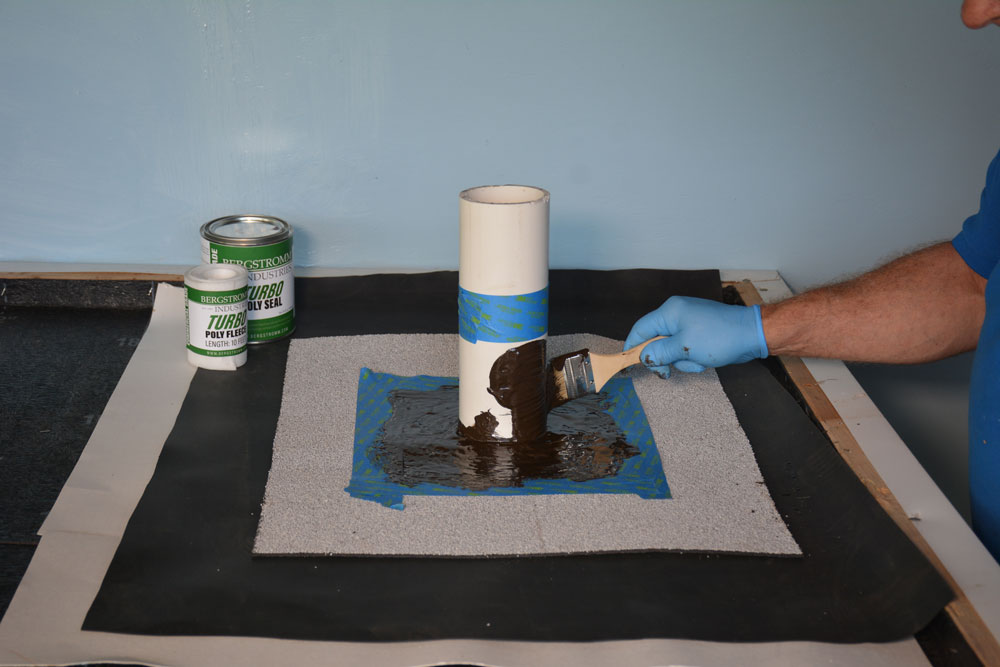
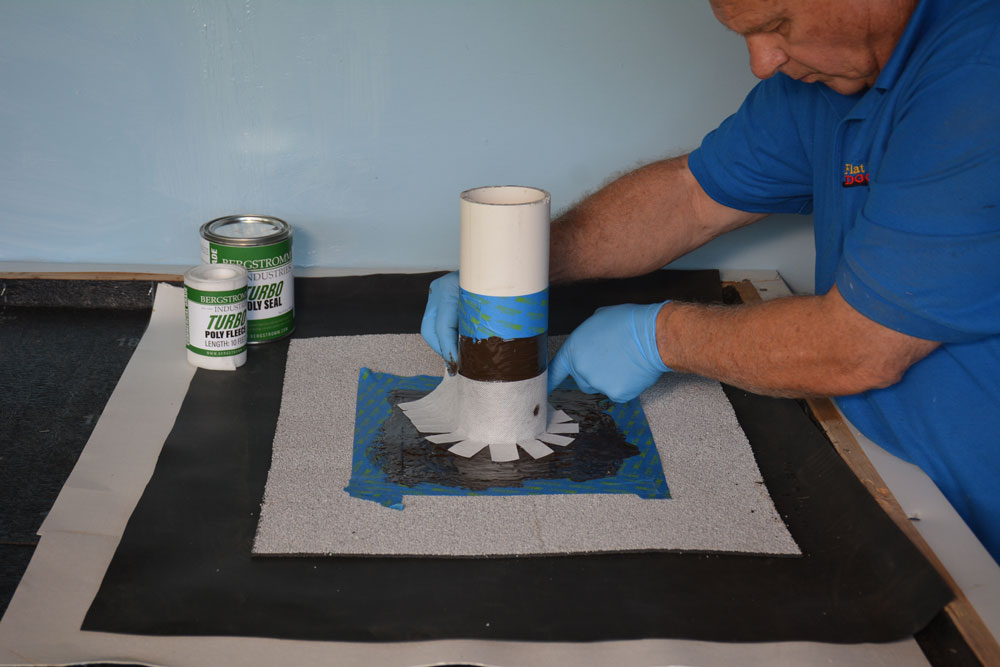
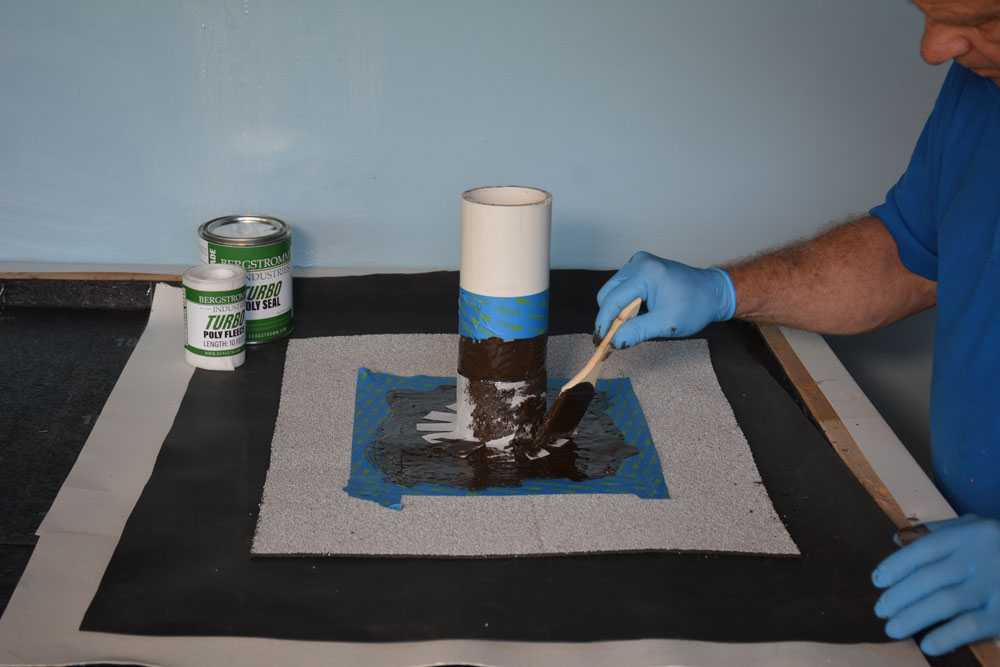
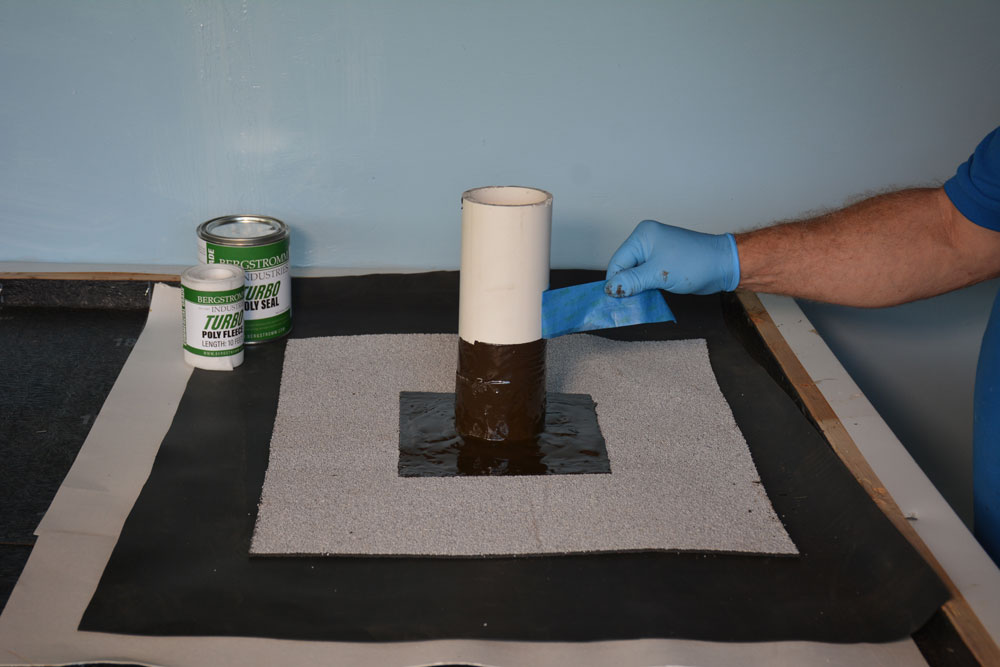
Turbo Poly Seal is easy to use. The kit comes with resin and polyester fleece. Turbo Poly Seal is applied with a brush to a dust-free surface, and then the fleece is embedded in the polyurethane, with another coat of resin brushed over it.

Roof leak repair sealant
Prepare the surface where repairs needed.

Turbo Poly Seal

Introducing Turbo Poly Seal – the ultimate roof leak repair sealant. Engineered with a blend of polyurethane and bituminous resins, it tackles all types of roof leaks. Turbo Poly Seal boasts exceptional adhesive properties, adhering to almost any surface except EPDM rubber. Its user-friendly application includes brushing the resin onto a clean surface, embedding the included polyester fleece, and applying an additional coat of resin. Say goodbye to roof leaks with Turbo Poly Seal.

Metal Roof Leak Repair

Turbo Poly Seal is the ideal solution for metal roof leak repair. This high-quality roof leak repair sealant is specifically formulated to tackle all types of leaks, from flashing to drains, skylights, and chimneys. Its unique composition, consisting of polyurethane and bituminous resins, ensures exceptional adhesion to various surfaces. It is important to note that Turbo Poly Seal effectively connects almost any material except EPDM Rubber. Applying the Turbo Poly Seal is a breeze, and the kit provides resin and polyester fleece. Brush the sealant onto a dust-free surface, embed the fleece into the polyurethane, and apply another coat of resin to complete the repair.

Turbo Poly Seal - paint 1st coat of resin to surface
Paint the 1st coat of Turbo Poly Seal to a clean surface

Chimney Leak Repair

Turbo Poly Seal is the ultimate solution for chimney leak repair and other roof leak issues. Its specially formulated combination of polyurethane and bituminous resins ensures outstanding adhesion on most surfaces.

It’s important to note that Turbo Poly Seal is incompatible with EPDM Rubber. To apply Turbo Poly Seal, brush the resin onto a clean surface, embed the polyester fleece into the polyurethane, and apply an additional coat of resin. This straightforward process is easy for anyone to follow.

Remember, regular maintenance is crucial for every building’s roof. Whether it’s chimney flashing, drains, skylights, or any other source of leaks, Turbo Poly Seal is the ideal solution for effectively fixing those problems.

Skylight and EPDM Rubber Roofs

Introducing Super Silicone Seal – the ultimate solution for repairing skylights and EPDM rubber roofs. With Super Silicone Seal, you can easily tackle any leak problems your roof may encounter.  Super Silicone Seal is the go-to choice for comprehensive roof maintenance from flashing to drains, skylights to chimneys.

Unlike other sealants, Super Silicone Seal offers superior durability and flexibility, making it perfect for EPDM rubber roofs. Its advanced composition allows for easy application, ensuring a hassle-free experience. The kit includes silica resin and polyester fleece, which are applied using a brush onto a clean surface. The fleece is then embedded in the silicone, with an additional coat of silicone applied for added protection.

Don’t let roof leaks disrupt your peace of mind. Choose Super Silicone Seal and experience the best in roof leak repair sealants. Order your kit today and safeguard your skylights and EPDM rubber roofs effectively.

Cut Turbo Poly Fleece to size and apply over resin
Add a second coat of Turbo Poly Seal Resin over the fleece
Remove masking tape from Turbo Poly Seal before drying
Make sure to remove the masking tape from the Turbo Poly Seal before it dries
Videos to help you:
Super Silicone Seal - https://bergstromm.com/
#diy #metalroof 
Repairing metal roof leak seams is a crucial step in preventing water damage and extending the life of your roof. Super Silicone Seal is one of the most effective and long-lasting solutions, a high-performance, weather-resistant sealant explicitly designed for challenging roofing applications. Whether dealing with tiny cracks or major seam leaks, Super Silicone Seal offers superior adhesion and flexibility, ensuring a waterproof bond that withstands extreme temperatures and harsh conditions. In this guide, we'll walk you through how to repair metal roof leak seams with Super Silicone Seal, helping you confidently and efficiently protect your home or building.

## How to Repair Metal Roof Leak Seams with Super Silicone Seal – Step-by-Step Tutorial

Leaking metal roof seams can cause serious damage if not properly sealed. Many quick fixes fail because they ignore a crucial step—reinforcement with fleece fabric. In this tutorial, filmed during a real repair job at a shipping warehouse near Cape Cod, Massachusetts, we’ll show you the right way to fix a leaky seam using Super Silicone Seal and fleece for a long-lasting, waterproof result.

### 🔧 What You’ll Need:
- Super Silicone Seal  
- Reinforcing fleece (cut to size)  
- Grinder or wire brush  
- Caulking gun  
- Scissors or utility knife  
- Gloves and safety gear  
---
### ✅ Step 1: Identify the Problem Area

Begin by thoroughly inspecting the metal roof seam. Look for areas where water pools, visible gaps, or where previous repairs failed. In many cases, people use liquid sealant, but the leak will return without fleece reinforcement.
 ⚠️ **Pro Tip:** Never apply just liquid sealant over seams. Water will eventually seep through, especially if the surface isn’t reinforced.
---
### ✅ Step 2: Remove Old Sealant and Clean the Surface

Use a grinder or wire brush to remove any old silicone, paint, or debris from the seam. The goal is to create a smooth, clean surface for proper adhesion.

“I used a grinder to smooth out the seam—the surface must be prepped right so the new sealant bonds well.”
---
### ✅ Step 3: Apply Super Silicone Seal to the Seam

With the surface prepped, apply a **generous bead of Super Silicone Seal** directly into the seam. This forms the first layer of your waterproof barrier.
---
### ✅ Step 4: Cut and Apply Fleece Reinforcement

Cut a strip of fleece to fit the seam. Carefully **lay the fleece over the fresh silicone**, pressing it in firmly.
 🚫 Do **not** go over screws with the fleece. Instead, **dab the screws individually** with silicone before applying the fleece just shy of them. Going over screws can cause bumps and compromise the seal.
---
### ✅ Step 5: Press Fleece Flat—Especially in Corners

Make sure the fleece lies completely flat along the seam, **especially in the corners**. Water can get underneath and defeat the whole purpose if it's not perfectly pressed into the corners.

 “Corners are critical—water will find its way in if you miss the corners. Take your time here.”
---
### ✅ Step 6: Apply a Final Coat of Super Silicone Seal Over the Fleece

Once the fleece is in place, apply another coat of Super Silicone Seal over the top, fully embedding the fleece. Smooth it out evenly to ensure full coverage and maximum protection.
---
### ✅ Step 7: Let it Cure (Rain? No Problem!)

One of the best things about Super Silicone Seal is its quick curing capability. **It can withstand rain just 30 minutes after application**, making it perfect for unpredictable weather.
---
### ✅ Final Thoughts
Fixing a leaking metal roof seam is simple **if you know what you’re doing**. The key is using **both Super Silicone Seal and reinforcing fleece**—not just liquid sealant alone. This method creates a durable, flexible, waterproof barrier that meets the elements.

This method was successfully used on a commercial metal roof near Cape Cod, Massachusetts—and it works just as well for homes, warehouses, and other metal structures.

Chapters:
0:00 - Explaining Repair problems
1:15 - How to fix a leaky seam
2:00 - Use Super Silicone Seal
4:00 It can Rain within 30 minutes

Super Silicone Seal – https://bergstromm.com/
#diy #metalroof
Repairing metal roof leak seams is a crucial step in preventing water damage and extending the life of your roof. Super Silicone Seal is one of the most effective and long-lasting solutions, a high-performance, weather-resistant sealant explicitly designed for challenging roofing applications. Whether dealing with tiny cracks or major seam leaks, Super Silicone Seal offers superior adhesion and flexibility, ensuring a waterproof bond that withstands extreme temperatures and harsh conditions. In this guide, we'll walk you through how to repair metal roof leak seams with Super Silicone Seal, helping you confidently and efficiently protect your home or building.

## How to Repair Metal Roof Leak Seams with Super Silicone Seal – Step-by-Step Tutorial

Leaking metal roof seams can cause serious damage if not properly sealed. Many quick fixes fail because they ignore a crucial step—reinforcement with fleece fabric. In this tutorial, filmed during a real repair job at a shipping warehouse near Cape Cod, Massachusetts, we’ll show you the right way to fix a leaky seam using Super Silicone Seal and fleece for a long-lasting, waterproof result.

### 🔧 What You’ll Need:
– Super Silicone Seal
– Reinforcing fleece (cut to size)
– Grinder or wire brush
– Caulking gun
– Scissors or utility knife
– Gloves and safety gear

### ✅ Step 1: Identify the Problem Area

Begin by thoroughly inspecting the metal roof seam. Look for areas where water pools, visible gaps, or where previous repairs failed. In many cases, people use liquid sealant, but the leak will return without fleece reinforcement.
⚠️ **Pro Tip:** Never apply just liquid sealant over seams. Water will eventually seep through, especially if the surface isn’t reinforced.

### ✅ Step 2: Remove Old Sealant and Clean the Surface

Use a grinder or wire brush to remove any old silicone, paint, or debris from the seam. The goal is to create a smooth, clean surface for proper adhesion.

“I used a grinder to smooth out the seam—the surface must be prepped right so the new sealant bonds well.”

### ✅ Step 3: Apply Super Silicone Seal to the Seam

With the surface prepped, apply a **generous bead of Super Silicone Seal** directly into the seam. This forms the first layer of your waterproof barrier.

### ✅ Step 4: Cut and Apply Fleece Reinforcement

Cut a strip of fleece to fit the seam. Carefully **lay the fleece over the fresh silicone**, pressing it in firmly.
🚫 Do **not** go over screws with the fleece. Instead, **dab the screws individually** with silicone before applying the fleece just shy of them. Going over screws can cause bumps and compromise the seal.

### ✅ Step 5: Press Fleece Flat—Especially in Corners

Make sure the fleece lies completely flat along the seam, **especially in the corners**. Water can get underneath and defeat the whole purpose if it's not perfectly pressed into the corners.

“Corners are critical—water will find its way in if you miss the corners. Take your time here.”

### ✅ Step 6: Apply a Final Coat of Super Silicone Seal Over the Fleece

Once the fleece is in place, apply another coat of Super Silicone Seal over the top, fully embedding the fleece. Smooth it out evenly to ensure full coverage and maximum protection.

### ✅ Step 7: Let it Cure (Rain? No Problem!)

One of the best things about Super Silicone Seal is its quick curing capability. **It can withstand rain just 30 minutes after application**, making it perfect for unpredictable weather.

### ✅ Final Thoughts
Fixing a leaking metal roof seam is simple **if you know what you’re doing**. The key is using **both Super Silicone Seal and reinforcing fleece**—not just liquid sealant alone. This method creates a durable, flexible, waterproof barrier that meets the elements.

This method was successfully used on a commercial metal roof near Cape Cod, Massachusetts—and it works just as well for homes, warehouses, and other metal structures.

Chapters:
0:00 – Explaining Repair problems
1:15 – How to fix a leaky seam
2:00 – Use Super Silicone Seal
4:00 It can Rain within 30 minutes

YouTube Video VVVwZ0xtWTBTSk5tZTFMaHF0RHJEMDh3LnNaUHBXcTlRU3o0

Metal Roof Seam Leak Repair – DIY fast, easy and permanently

Modified Bitumen Rubber Roof Repair Using Turbo Poly Seal
Repairing a modified bitumen rubber roof is fast and effective with Turbo Poly Seal, a durable, waterproof sealant designed for long-term performance. Ideal for torch-down roofing systems, Turbo Poly Seal is compatible with asphalt-based membranes, making it perfect for sealing leaks around roof drains, seams, and flashings. Its unique formulation of asphalt and urethane provides strong adhesion and flexibility, even in harsh weather. Unlike traditional torch-down repair, Turbo Poly Seal offers a more leisurely, safer alternative with long-lasting results. Whether fixing a poorly torched seam or sealing a troublesome leak, this product ensures a strong, leak-proof finish every time.

Modified Bitumen Roof Repair with Turbo Poly Seal
Step 1: Inspect the Roof

Begin by checking the modified bitumen (torch-down) roof around the area of concern.

Look for poorly torched seams, especially around roof drains, where leaks often occur.

In this case, the roof is generally in good condition, but there’s a clear issue with an area that wasn't torched correctly.

Step 2: Identify the Problem

Carefully examine the seams. If they’re tight and well-sealed, great.

However, if you notice areas where the bitumen hasn’t melted and bonded correctly (as in this case), that’s your problem spot.

Step 3: Clean the Area

Before applying anything, clean the surface thoroughly.

Remove any loose granules, dirt, or debris around the leak.

Step 4: Stir the Turbo Poly Seal

Open the can of Turbo Poly Seal.

If it’s already well-mixed, no need to stir, but otherwise, give it a good mix for even consistency.

Step 5: Apply the First Coat

Using a brush, apply a generous coat of Turbo Poly Seal directly over the problem area.

Make sure to fully cover the damaged section with a smooth layer.

Step 6: Add Reinforcement Fleece

Place a piece of roofing fleece directly over the wet sealant.

Press it in gently so it fully embeds into the first coat.

Step 7: Apply a Second Coat

Brush a second layer of Turbo Poly Seal over the fleece.

Ensure full coverage to create a watertight bond that will last for years.

Step 8: Let it Cure

Once applied, let the patch cure. Turbo Poly Seal forms a strong, durable finish.

It will dry into a slightly light brown color and remain flexible and effective over time.

Important Tips:

Please use Turbo Poly Seal only on compatible roofs. It works with modified bitumen, asphalt, and certain membranes, but not EPDM.

It’s a great alternative to torching, especially over older or uneven materials.

Proof of Longevity:

Patches done five years ago still hold up perfectly, with no leaks or degradation.

Once cured, the material blends well and remains intact for the long term.

Chapters:
0:00 -  Rubber Roof Drain Seam Repair
0:41 - Finding the loose seam
1:12 Preparing the seam
1:41 Repairing seam with Turbo Poly Seal
4:30 See older repairs done with Turbo Poly Seal

Modified Bitumen Rubber Roof Repair Using Turbo Poly Seal
Repairing a modified bitumen rubber roof is fast and effective with Turbo Poly Seal, a durable, waterproof sealant designed for long-term performance. Ideal for torch-down roofing systems, Turbo Poly Seal is compatible with asphalt-based membranes, making it perfect for sealing leaks around roof drains, seams, and flashings. Its unique formulation of asphalt and urethane provides strong adhesion and flexibility, even in harsh weather. Unlike traditional torch-down repair, Turbo Poly Seal offers a more leisurely, safer alternative with long-lasting results. Whether fixing a poorly torched seam or sealing a troublesome leak, this product ensures a strong, leak-proof finish every time.

Modified Bitumen Roof Repair with Turbo Poly Seal
Step 1: Inspect the Roof

Begin by checking the modified bitumen (torch-down) roof around the area of concern.

Look for poorly torched seams, especially around roof drains, where leaks often occur.

In this case, the roof is generally in good condition, but there’s a clear issue with an area that wasn't torched correctly.

Step 2: Identify the Problem

Carefully examine the seams. If they’re tight and well-sealed, great.

However, if you notice areas where the bitumen hasn’t melted and bonded correctly (as in this case), that’s your problem spot.

Step 3: Clean the Area

Before applying anything, clean the surface thoroughly.

Remove any loose granules, dirt, or debris around the leak.

Step 4: Stir the Turbo Poly Seal

Open the can of Turbo Poly Seal.

If it’s already well-mixed, no need to stir, but otherwise, give it a good mix for even consistency.

Step 5: Apply the First Coat

Using a brush, apply a generous coat of Turbo Poly Seal directly over the problem area.

Make sure to fully cover the damaged section with a smooth layer.

Step 6: Add Reinforcement Fleece

Place a piece of roofing fleece directly over the wet sealant.

Press it in gently so it fully embeds into the first coat.

Step 7: Apply a Second Coat

Brush a second layer of Turbo Poly Seal over the fleece.

Ensure full coverage to create a watertight bond that will last for years.

Step 8: Let it Cure

Once applied, let the patch cure. Turbo Poly Seal forms a strong, durable finish.

It will dry into a slightly light brown color and remain flexible and effective over time.

Important Tips:

Please use Turbo Poly Seal only on compatible roofs. It works with modified bitumen, asphalt, and certain membranes, but not EPDM.

It’s a great alternative to torching, especially over older or uneven materials.

Proof of Longevity:

Patches done five years ago still hold up perfectly, with no leaks or degradation.

Once cured, the material blends well and remains intact for the long term.

Chapters:
0:00 – Rubber Roof Drain Seam Repair
0:41 – Finding the loose seam
1:12 Preparing the seam
1:41 Repairing seam with Turbo Poly Seal
4:30 See older repairs done with Turbo Poly Seal

YouTube Video VVVwZ0xtWTBTSk5tZTFMaHF0RHJEMDh3LklLYzB1OGNoSmx3

Rubber Roof Drain Seam Repair 4K

Roof sealing mistakes can lead to costly damage! If you've ever wondered why sealing your roof seams might do more harm than good, this video explains it all. Discover why water buildup, rust, and improper sealing techniques can worsen roof issues instead of fixing them. Learn the right way to address leaks without compromising the roof’s integrity. Watch as we inspect a slippery rooftop, uncover hidden rust spots, and explain why proper drainage is key to avoiding long-term water damage.

Roof sealing mistakes can lead to costly damage! If you've ever wondered why sealing your roof seams might do more harm than good, this video explains it all. Discover why water buildup, rust, and improper sealing techniques can worsen roof issues instead of fixing them. Learn the right way to address leaks without compromising the roof’s integrity. Watch as we inspect a slippery rooftop, uncover hidden rust spots, and explain why proper drainage is key to avoiding long-term water damage.

Now, here's a rewritten version of your script for better readability and clarity:

(Walking on the roof)
"Alright, I want to show you exactly where the problem is so we can fix it. Let me climb up—it's really slippery, so I must be careful. My wife is sliding, too!

Here’s the issue: You cannot seal these seams because it will cause more problems. Look at this and see how they tried to seal it. That’s not the right way.

They even applied caulk here, but that won’t solve the issue. Do we need to respray the entire roof? No. The real problem is that water is getting in from the top and seeping into the seams, causing the damage.

Let me show you—this tape they applied? It’s trapping water inside, and that leads to rust. See the rust here? That’s what happens when water has nowhere to go.

You should never seal an entire roof—never—because that actually makes the rusting worse. I’ve already found rust spots where water has been sitting, and it keeps collecting in these areas. The roof already has a factory coating, so sealing it improperly locks in moisture.

Instead, you need to fix the actual leaks—not coat everything. That’s why I opened this seam: water could drain properly. If you block it, water will accumulate, and one bad day of rain could cause severe damage.

Alright, sweetheart, we’re done here. Let’s go. Vamos!"

0:00 - Do not seal these seams
0:50 Ripping tape sealant of
1:43 Where water starts to get in
2:15 Rust began to creep in

Roof sealing mistakes can lead to costly damage! If you've ever wondered why sealing your roof seams might do more harm than good, this video explains it all. Discover why water buildup, rust, and improper sealing techniques can worsen roof issues instead of fixing them. Learn the right way to address leaks without compromising the roof’s integrity. Watch as we inspect a slippery rooftop, uncover hidden rust spots, and explain why proper drainage is key to avoiding long-term water damage.

Roof sealing mistakes can lead to costly damage! If you've ever wondered why sealing your roof seams might do more harm than good, this video explains it all. Discover why water buildup, rust, and improper sealing techniques can worsen roof issues instead of fixing them. Learn the right way to address leaks without compromising the roof’s integrity. Watch as we inspect a slippery rooftop, uncover hidden rust spots, and explain why proper drainage is key to avoiding long-term water damage.

Now, here's a rewritten version of your script for better readability and clarity:

(Walking on the roof)
"Alright, I want to show you exactly where the problem is so we can fix it. Let me climb up—it's really slippery, so I must be careful. My wife is sliding, too!

Here’s the issue: You cannot seal these seams because it will cause more problems. Look at this and see how they tried to seal it. That’s not the right way.

They even applied caulk here, but that won’t solve the issue. Do we need to respray the entire roof? No. The real problem is that water is getting in from the top and seeping into the seams, causing the damage.

Let me show you—this tape they applied? It’s trapping water inside, and that leads to rust. See the rust here? That’s what happens when water has nowhere to go.

You should never seal an entire roof—never—because that actually makes the rusting worse. I’ve already found rust spots where water has been sitting, and it keeps collecting in these areas. The roof already has a factory coating, so sealing it improperly locks in moisture.

Instead, you need to fix the actual leaks—not coat everything. That’s why I opened this seam: water could drain properly. If you block it, water will accumulate, and one bad day of rain could cause severe damage.

Alright, sweetheart, we’re done here. Let’s go. Vamos!"

0:00 – Do not seal these seams
0:50 Ripping tape sealant of
1:43 Where water starts to get in
2:15 Rust began to creep in

YouTube Video VVVwZ0xtWTBTSk5tZTFMaHF0RHJEMDh3LllUd1l0RW9ISW5J

Sinful Repair on a Metal Roof Seam

Turbo Poly Seal - https://bergstromm.com/
More videos on repairing leaks on a metal roof - https://www.youtube.com/watch?v=IR9lRAMiHLk&list=PLIh0XEpRQt7zJXfs1pD8K0_Gq4d37WctE
#diy #metalroof 
How to Fix a Leaking Metal Roof Seam and Screws

All right, we’ve got a leaking metal roof. We've done a lot of leak repairs on the roofs around here, but this one developed another leak over the winter. Ice built up, and we assume the leak is along this seam. You can’t see it just by looking, so let me show you something important.

First, you never need to coat a roof unless there's rust. No rust means no need for a coating. The only thing you need to do is find the leak. Now, all the screws have already been addressed—you can see that every screw is covered with Turbo Poly Seal, so we know it's not leaking from the screws. That means we’re left with two possibilities: the seam itself or this screw with visible rust around it.

I'm going to show you how to fix this step by step. This is a common issue; if you follow along, you can repair it yourself.

Step 1: Cleaning the Surface
First, I determined the leak is within a 20x20 ft section, so I’ll focus on this area. I cleaned the surface using my angle grinder with a wire brush attachment.

Look at this—this is just dirt. See how my finger gets dirty? You can’t apply sealant over dirt or dust; it won’t stick. So, I brush it off with steel until it's nice and clean. Then, I wipe it down to ensure I have a solid surface to work on. Now, we're ready for the next step.

Step 2: Applying the Sealant and Fleece
Once I’ve mixed my sealant, I apply a coat directly over the seam—this is the easiest and most effective way to fix a leaking metal roof seam.

Next, I place the fleece over the seam, making sure it covers the entire area but doesn’t go over the screws. This step is crucial because you cannot apply sealant over a seam without using fleece. If you do, it will crack and fail over time. The fleece reinforces the seal and prevents any future leaks.

Now, I apply another coat of sealant over the fleece. Here’s something significant—today is windy, and you don’t want any gaps in the fleece, especially at the corners. If there’s a small gap, water will find its way in and cause problems. Watch how I press the fleece into the corner, ensuring it conforms to the roof's ridges. No gaps. That’s key to a long-lasting repair.

After that, I apply a second coat over the fleece and dab sealant over every screw. These screws were already sealed before, but I always double-check and touch them up just in case. And that’s it—this seam is now fully sealed and won’t leak anymore.

Step 3: Fixing a Leaking Screw
Now, let me show you how to properly fix a leaking screw.

Here’s a screw that wasn’t sealed correctly before. I removed the old sealant, and you can see the problem—the neoprene washer is rusty, meaning it wasn’t sealing properly. That’s why water was getting in.

To fix this, I take the screw out and clean the area with a wire brush. You cannot put the same size screw back in—it won’t hold properly. Instead, I replace it with a slightly larger screw, making sure the new neoprene washer is in good condition.

Now, I apply a small dab of Turbo Poly Seal over the screw to protect it from rust and ensure a watertight seal. That’s it—this screw will not leak anymore.

Final Thoughts
And that’s how you fix a leaking seam and a leaking screw on a metal roof! Simple, effective, and long-lasting.

If you found this helpful, give it a thumbs up, and I’ll see you in the next video

Chapters;
0:00 - No need for coating the roof
1:18 - Cleaning the surface
2:31 - Using a Liquid Sealer
6:41 - Replace Screws and Seal

Turbo Poly Seal – https://bergstromm.com/
More videos on repairing leaks on a metal roof – https://www.youtube.com/watch?v=IR9lRAMiHLk&list=PLIh0XEpRQt7zJXfs1pD8K0_Gq4d37WctE
#diy #metalroof
How to Fix a Leaking Metal Roof Seam and Screws

All right, we’ve got a leaking metal roof. We've done a lot of leak repairs on the roofs around here, but this one developed another leak over the winter. Ice built up, and we assume the leak is along this seam. You can’t see it just by looking, so let me show you something important.

First, you never need to coat a roof unless there's rust. No rust means no need for a coating. The only thing you need to do is find the leak. Now, all the screws have already been addressed—you can see that every screw is covered with Turbo Poly Seal, so we know it's not leaking from the screws. That means we’re left with two possibilities: the seam itself or this screw with visible rust around it.

I'm going to show you how to fix this step by step. This is a common issue; if you follow along, you can repair it yourself.

Step 1: Cleaning the Surface
First, I determined the leak is within a 20×20 ft section, so I’ll focus on this area. I cleaned the surface using my angle grinder with a wire brush attachment.

Look at this—this is just dirt. See how my finger gets dirty? You can’t apply sealant over dirt or dust; it won’t stick. So, I brush it off with steel until it's nice and clean. Then, I wipe it down to ensure I have a solid surface to work on. Now, we're ready for the next step.

Step 2: Applying the Sealant and Fleece
Once I’ve mixed my sealant, I apply a coat directly over the seam—this is the easiest and most effective way to fix a leaking metal roof seam.

Next, I place the fleece over the seam, making sure it covers the entire area but doesn’t go over the screws. This step is crucial because you cannot apply sealant over a seam without using fleece. If you do, it will crack and fail over time. The fleece reinforces the seal and prevents any future leaks.

Now, I apply another coat of sealant over the fleece. Here’s something significant—today is windy, and you don’t want any gaps in the fleece, especially at the corners. If there’s a small gap, water will find its way in and cause problems. Watch how I press the fleece into the corner, ensuring it conforms to the roof's ridges. No gaps. That’s key to a long-lasting repair.

After that, I apply a second coat over the fleece and dab sealant over every screw. These screws were already sealed before, but I always double-check and touch them up just in case. And that’s it—this seam is now fully sealed and won’t leak anymore.

Step 3: Fixing a Leaking Screw
Now, let me show you how to properly fix a leaking screw.

Here’s a screw that wasn’t sealed correctly before. I removed the old sealant, and you can see the problem—the neoprene washer is rusty, meaning it wasn’t sealing properly. That’s why water was getting in.

To fix this, I take the screw out and clean the area with a wire brush. You cannot put the same size screw back in—it won’t hold properly. Instead, I replace it with a slightly larger screw, making sure the new neoprene washer is in good condition.

Now, I apply a small dab of Turbo Poly Seal over the screw to protect it from rust and ensure a watertight seal. That’s it—this screw will not leak anymore.

Final Thoughts
And that’s how you fix a leaking seam and a leaking screw on a metal roof! Simple, effective, and long-lasting.

If you found this helpful, give it a thumbs up, and I’ll see you in the next video

Chapters;
0:00 – No need for coating the roof
1:18 – Cleaning the surface
2:31 – Using a Liquid Sealer
6:41 – Replace Screws and Seal

YouTube Video VVVwZ0xtWTBTSk5tZTFMaHF0RHJEMDh3LmZydWo0dnZySDhz

Seal metal Roof Seams and Screws

Super Silicone Seal - https://bergstromm.com/
More videos on repairing EPDM and metal roofs - https://www.youtube.com/watch?v=sxXBS0v3hVY&list=PLIh0XEpRQt7zbEZ_Zy6qKqmz9YSULl102

Why Coating a Metal Roof is a Bad Idea – The Right Way to Fix Leaks
If you’re considering coating your metal roof, you might want to think twice. While roof coatings are often marketed as a long-term solution for leaks, they don’t address the root cause and can trap moisture, leading to rust, peeling, and even worse leaks over time. Instead of wasting time and money on coatings, the best way to prevent leaks is to fix the real issue—loose screws, failing seams, and rust spots. In this video, I’ll show you the correct method to repair a leaking metal roof so you won’t have to worry about water damage again.

Why You Shouldn’t Use Acrylic Coatings on a Metal Roof
I want to discuss coatings on metal roofs—specifically, why acrylic coatings are a bad idea. There are companies selling acrylic or latex-based coatings, but at the end of the day, they're just paint. You should never use them on a metal roof.

Let me show you exactly why. Here’s a clip that demonstrates how bad acrylic coatings can be.

The Problem with Acrylic Roof Coatings
Take a look at this roof—it’s a huge one. From day one, they had issues with the coating. Now, watch what happens when the coating starts peeling.

See this? When the coating comes loose, water gets underneath it. Once the water is trapped, it flows down toward the fasteners. Right here, you can see it—this area is entirely open and wet underneath.

Water gets trapped and pools around the fasteners, and wherever water pools, rust forms. That’s precisely what happened here—so many fasteners are already rusting.

Now, the owners tried to cover the problem by applying another layer of elastomeric coating over the acrylic. But guess what? It’s still wet underneath. Look, my finger is wet from touching it. You should never coat a metal roof with acrylic or elastomeric coatings.

When Should You Coat a Metal Roof?
Here’s my take—I don’t like coatings on metal roofs unless they are genuinely needed. If the roof isn’t rusted and the only issue is the screws, then there is no reason to coat it.

The only time you should coat a metal roof is when there are oxidation, rust, or small pinholes that are hard to find.

Let me tell you what happened here. Two years ago, we started fixing this roof. We sealed every screw and every seam using Turbo Poly Seal—you can see the brown streaks from it. We thought we had sealed all the leaks, but we still couldn’t stop the water from getting in.

Eventually, we had no choice but to coat this section of the roof—and that’s where Super Silicone Seal comes in.

The Best Way to Coat a Metal Roof (If You Have To)
Super Silicone Seal is the only coating I recommend for metal roofs. Unlike acrylic coatings, it does not peel, and it won’t trap moisture underneath.

We used two 5-gallon buckets for this roof to cover about 800 square feet. That’s roughly 300 square feet per bucket or 30 square feet per gallon. It’s costly, but in cases like this—where we tried everything else and couldn’t find the leak—it was our last resort.

Usually, I never recommend coating an entire metal roof unless absolutely necessary. But in this case, after multiple attempts to fix the leaks, we had no other choice.

Final Thoughts
If you coat a metal roof, do not use acrylic or latex coatings—they don’t work. Instead, use Super Silicone Seal, but only if necessary.

That’s my two cents on metal roof coatings. Hopefully, this information will help you make the right decision for your roof.

All right, we’re wrapping up here—the sun is going down, it’s 35°F, and it’s getting cold. My wife and I will see you in the following video. Until next time!

Chapters: 
0:00 - Coatings on a Metal Roof
0:24 - Video Clip on a Bad coating
1:44 No Rust No Coating
3:49 Process of Coating a metal roof

Super Silicone Seal – https://bergstromm.com/
More videos on repairing EPDM and metal roofs – https://www.youtube.com/watch?v=sxXBS0v3hVY&list=PLIh0XEpRQt7zbEZ_Zy6qKqmz9YSULl102

Why Coating a Metal Roof is a Bad Idea – The Right Way to Fix Leaks
If you’re considering coating your metal roof, you might want to think twice. While roof coatings are often marketed as a long-term solution for leaks, they don’t address the root cause and can trap moisture, leading to rust, peeling, and even worse leaks over time. Instead of wasting time and money on coatings, the best way to prevent leaks is to fix the real issue—loose screws, failing seams, and rust spots. In this video, I’ll show you the correct method to repair a leaking metal roof so you won’t have to worry about water damage again.

Why You Shouldn’t Use Acrylic Coatings on a Metal Roof
I want to discuss coatings on metal roofs—specifically, why acrylic coatings are a bad idea. There are companies selling acrylic or latex-based coatings, but at the end of the day, they're just paint. You should never use them on a metal roof.

Let me show you exactly why. Here’s a clip that demonstrates how bad acrylic coatings can be.

The Problem with Acrylic Roof Coatings
Take a look at this roof—it’s a huge one. From day one, they had issues with the coating. Now, watch what happens when the coating starts peeling.

See this? When the coating comes loose, water gets underneath it. Once the water is trapped, it flows down toward the fasteners. Right here, you can see it—this area is entirely open and wet underneath.

Water gets trapped and pools around the fasteners, and wherever water pools, rust forms. That’s precisely what happened here—so many fasteners are already rusting.

Now, the owners tried to cover the problem by applying another layer of elastomeric coating over the acrylic. But guess what? It’s still wet underneath. Look, my finger is wet from touching it. You should never coat a metal roof with acrylic or elastomeric coatings.

When Should You Coat a Metal Roof?
Here’s my take—I don’t like coatings on metal roofs unless they are genuinely needed. If the roof isn’t rusted and the only issue is the screws, then there is no reason to coat it.

The only time you should coat a metal roof is when there are oxidation, rust, or small pinholes that are hard to find.

Let me tell you what happened here. Two years ago, we started fixing this roof. We sealed every screw and every seam using Turbo Poly Seal—you can see the brown streaks from it. We thought we had sealed all the leaks, but we still couldn’t stop the water from getting in.

Eventually, we had no choice but to coat this section of the roof—and that’s where Super Silicone Seal comes in.

The Best Way to Coat a Metal Roof (If You Have To)
Super Silicone Seal is the only coating I recommend for metal roofs. Unlike acrylic coatings, it does not peel, and it won’t trap moisture underneath.

We used two 5-gallon buckets for this roof to cover about 800 square feet. That’s roughly 300 square feet per bucket or 30 square feet per gallon. It’s costly, but in cases like this—where we tried everything else and couldn’t find the leak—it was our last resort.

Usually, I never recommend coating an entire metal roof unless absolutely necessary. But in this case, after multiple attempts to fix the leaks, we had no other choice.

Final Thoughts
If you coat a metal roof, do not use acrylic or latex coatings—they don’t work. Instead, use Super Silicone Seal, but only if necessary.

That’s my two cents on metal roof coatings. Hopefully, this information will help you make the right decision for your roof.

All right, we’re wrapping up here—the sun is going down, it’s 35°F, and it’s getting cold. My wife and I will see you in the following video. Until next time!

Chapters:
0:00 – Coatings on a Metal Roof
0:24 – Video Clip on a Bad coating
1:44 No Rust No Coating
3:49 Process of Coating a metal roof

YouTube Video VVVwZ0xtWTBTSk5tZTFMaHF0RHJEMDh3Lmc5VVdiQm5rb1dZ

Coating a Metal Roof with Super Silicone Seal – Good or Bad?

See the progress of Roof Flashing over 2000 years – from Roman Empire to the Trump Empire

117 thoughts on “5 Ultimate Roof Leak Repair Sealant Tips – Chimney, Metal Roof – Turbo Poly Seal”

    1. Sorry, we do not sell in Canada yet. We still have to get approved by Customs.
      Yes, Turbo Poly Seal performs well in cold climates

          1. I believe they say you can paint with a oil base paint after 24hrs to help protect from UV rays anyhow. so you then can change the color.

  1. I live in the American Southwest, El Paso, Texas, how will this product hold up to the scorching heat of the Desert? If I can get five years between resealing of the roof fixtures and skylights I’ll be happy.

    1. Hi
      After applying the Turbo Poly Seal I recommend you coat it with Silver coating.
      That way you are sure that it is protected against ultraviolet rays.

        1. The silver coating is Aluminum Asphalt that can be purchased at Home Depot or any roofing supply house.

        2. Donald Arents

          How long to dry after 2 coats – was going to paint silver over, but still cakey – thanks

    2. Hi John. You should get 5 years easy. What I recommend in severe ultraviolet exposures is to paint the Turbo Poly seal with silver coating or any other oil-based paint. But, before painting it, paint an extra coat and wait a day or two before painting it with protective paint.

  2. how many square feet does 1 gallon cover?

    can this be used directly on top of a concrete chimney crown? what surface prep is required?

    1. Yes, it is perfect to apply it directly to any surface accept EPDM rubber. It works perfect on cement surfaces like chimney caps. There is no prep necessary.

      1. can you give me an examples of epdm rubber? is rubberized wet patch epdm? are rubber boots on vent pipes epdm? thanks

        1. EPDM is a black synthetic rubber that is the same they use for innertubes on car tires. I used the Turbo Poly Seal over a roof boot that is made from EPDM but made the transition from the pipe to the roof itself or the flashing.

    1. Not at this present time. We still have to register with customs. I don’t know of a similar product that can perform like Turbo Poly Seal.
      Sorry

  3. Bill Hallbauer

    do you have a retail store in your plant that I could visit to pick up my items and chat to be sure I understand how to successfully use your product?

  4. Can I use a product called Permakote (Nationwide Coating) as a top coat for the roof after I have installed Poly Turbo Seal where needed? It is a white roof coating used a lot here in Florida. The metal roof has had a few bad patch jobs and has a few leaks. Just bought the building so I want to start on the roof first.

    1. It is always to prepare the surface. Rust is like dirt. The Turbo Poly Seal will bond to the rust but the rust will flake away eventually.
      Rust is duo to Oxygen and moist. So anytime you cost metal with any type of coating, it is likely to prevent rust. In this case, yes, Turbo Poly Seal will prevent rust.

  5. What is the application temperature range?

    I have a metal roof and not sure if it would be too hot to apply Turbo Seal during the afternoon, if that is an issue.

    Thank you

    1. You can apply it at any temperature that you can work in.
      I have not seen or heard of any problems as far as temperatures.

  6. Can i spray paint turbo poly or just paint it.
    What type of paint do i have to us. You still do not sell in Canada.
    I want to fix a metal roof , which product is better. Turbo or the super silicon .

    Thanks Ewen

    1. Hi Greg. We don’t sell in 5 gal pails. The price would be the same whether you get it in Gallons or 5 gal pails. We found that it is best to use Turbo Poly Seal from gallons instead from 5 gal pails. The reason is once the container is opened, you are forced to use it it up what’s in the container. There is but a few days shelf life after opening the container. So using 1 gallon at a time allows you to pace the project better.

  7. Hi, I have a metal roof with a pitch to a flat metal roof with cracks where I had rolled out the silver coating over old tar repairs. Can I use the turbo poly seal right on top of the old repairs, or should I get down to the metal and wire brush clean before use?

  8. Hi, after doing a repair with the poly turbo seal on a flat metal roof, will you recommend using fibered aluminum coating or non-fibered aluminum coating? Any benefit of using one or the other? I am in South Florida where temperature are very hot and I believe the fibered have less elasticity on temperature changes,but definitely will like your opinion on this.

  9. Hi!
    On September 13th, in replying to a comment, you mentioned “… once the container is opened, you are forced to use up what’s in the container. There is but a few days shelf life after opening the container. ”

    I just received the turbo poly seal kit with two 29 oz cans. There is no mention of limited shelflife after opening a container; the only thing the can mentions, is to
    ” tightly seal all partially used containers.”

    Aside from closing the cans immediately after using, what things can be done to maximize the shelf life of containers that have been already been opened once? By “a few days” I’m guessing you were saying that once a can is opened, it must be used within three days. Is that a fair assumption?

    What is the shelf life on unopened/unused containers of Turbo Poly Seal?

    Thank you.
    Michael

    1. Hi Michael
      I’ll try to explain it better this time. Like any paint, Turbo Poly Seal is a combination of urethane and bituminous resins. Urethane cures when in contact with moisture. You will notice that most of the time the cans are overfilled, almost to the brim. The reason is to have as little air in the can when shipped to provide a longer shelf life. When you close the lid after using some of the content, as in any paint, you are trapping more air and moist in the can. This will cure a layer of the content in the can, but the layer will become the seal between the trapped air and the Turbo Poly Seal. I have used Turbo Poly Seal a month after opening the can but had to remove that fleece that forms on the top.
      There is no telling how long a shelf life you can expect. Sometimes the air is more humid and some times less. The reason I said to use all of the product in the can once opened, is to avoid people complaining. It is impossible to expect everyone to use common sense, some just don’t have it. Common sense comes with experience in a certain field.
      I really appreciate you bringing attention to this, I’ll make sure the labels will instructions include this situation as well.

      1. Thank you for your excellent explanation Naasfer!
        My favorite wood treatment — Minwax Helmsman Spar Urethane — also forms a hard cured layer on top in between uses. I now keep it in a glass jar to keep a better airtight seal. I don’t mind removing the film at each new use of the urethane — I always considered it part of the deal. I would not complain about something like that and it’s just as well that every DIYer knows what to expect and the many possible variables that come into play. It’s always great, and a real pleasure, to be enlightened by a true expert in any particular field. Thanks again!!

        1. Thanks for the compliment. Sometimes I am so tired, that I don’t spend enough time to explain things, but you are an encouragement to me

      2. TAMP AND SEAL LID REAL GOOD…TURN UPSIDE DOWN TO STORE IN DRY, TEMPERATE ENVIRONMENT…WORKS WITH ANY CANNED GOO OR SPRAY PAINT. WILL ADD A GOOD YEAR. YOUR WELCOME, MAMA KAY

    2. Hi Michael
      I am reading through the post this morning and noticed that I have never answered your questions. Sorry about that.
      Turbo Poly Seal is a combination of Urethane and Bituminous resins. Bitumen takes time to dry because of the petroleum in it has to evaporate. On the other hand Urethane cures because of humidity. When it comes in contact with moist then it starts curing. That is why when we fill the containers is to leave as little air as possible in it to limit the amount of moist trapped in the can at the time of shipping. Once you open the can and use part of the material, you then will trap air in the can after closing it. This happens with paints, urethane, and other paint products you buy at Home Depot or other stores.

  10. How long is the expected out door life on a repair on a chimney flashing repair, untill you need to add another application of turbo seal? Also how big of a gap would you recommend that turbo seal can seal over properly?

    1. Life expectancy varies from place to place. But I think between 10 and 15 years.
      To get better results, I normally fill the gaps with a urethane caulking. But I have made transitions over 2 inc gaps already.

  11. Once turbo seal is applied and has dried. what are the steps and procedures if a repair needs to be made on the flashing etc, how is turbo poly seal removed?

    1. I hope you never have to remove Turbo Poly Seal. It sticks pretty well to metal and everything else. Several times I had to throw away the paint mixer that I used to stirr up a 5 gal bucket after it dried up. Lately, I clean the blades very well so the Turbo poly seal would not harden on it.
      I don’t know the answer to that.

  12. I have a “lean to” carport that was not flashed but was “sealed” with silicone (something called ‘through the roof’, I believe). I use the term “sealed” very loosely because it leaks like a sieve. Should I remove the old silicone before applying the Poly Seal?

    1. Hey Bob
      Yes, you have to remove the silicone. Turbo Poly Seal will not adhere to silicone. The easiest way to go about it is to use an angle grinder with a hardwire bristle cup and grind the silicone off.
      Preparation is the key to ensure a leak-proof transition. Make sure to use either lacquer thinners or acetone that you can buy at Home Depot to remove the thin film left behind from the silicone. Use a rag and thinners and scrub it hard to get it clean.
      I am sorry that you have to do this over again.
      Good Luck

  13. One more question Naasfer… I have about 25 linear feet of seam to cover. Will the two quart kit be enough to complete that?

    1. Yes, it should be enough. The Turbo Poly Seal Kit comes with a 25 roll of fleece. What I suggest is to cut the fleece in half lengthwise. That way you will have enough fleece to do the job. As long as there is about an inch of fleece on either side of the seam

  14. Hello sir, greetings from Northern Idaho! I am excited to use your product and most all questions have been answered here and on your great YouTube videos. It is an early, bitter cold winter here so far and just bought a home with a metal roof leak. I understand clearly all the prep work and application of Turbo. All I want to know is can I apply this product in below freezing temperatures and it will cure or dry still?

    1. Hi Ryan
      Congratulations on the purchase of your new home. I have applied Turbo Poly Seal at temperatures around 20 degrees Fahrenheit and had no problem with it. Yes, it will cure because of humidity. Urethane cures fast when it comes in contact with moist.
      Also, it can rain 20 after applying the sealant and the rain will not harm it.

  15. Hello,

    I will be using the turbo poly seal to repair a cement chimney crown and the flashing on my brick chimney. I will also be treating the brick with a sealer(Seal Krete) . Should I apply the turbo poly seal before or after sealing the brick or does it not matter?

    1. Hi Jared
      Thanks for all the images you shared about the chimney. After reviewing the images, I concluded that it was not necessary to use any sealant on the face of the chimney. Turbo Poly seal is the right thing to use for the chimney cap and the flashing.
      Send me pics after you did the chimney please.

  16. It says this product “should last 10-15 years depending on thickness of application” my first question involves uv exposure, is this 10-15 years when coated with a uv protector like karnak silver, or is that 10-15 years with nothing covering the turbo poly seal? Also if we, as a company are going to charge a company or homeowner to apply your product they are going to want to know whats the warranty? do you have any guarantees/warranty’s on your product

    1. We can never give any guarantees since we are not in control of the process. It is like all the warrantees on the Silicone Caulkings that comes woth a 50 year warrantee. It makes no sence. That is being dishonest and people normally don’t give that any creedit.

  17. i’m reusing a steel roof on a metal carport frame and now my hole spacing is off can i patch the old screw holes with this product or do you know how i should go about this? would it be best to fill in the old holes with panhead screws first or can this handle that kind of void as is? also how long do you estimate it will last?

    Thanks,
    Matt

    1. Sorry for the late reply. You don’t need to fill the screw holes. Just cut a small piece of the Polyester fleece and cover the hole with that. make sure to use a steel brush on a drill or grinder to clean the surface.

  18. Question : Will this product repair roof leaks on steel shipping containers? Do you have any how to videos for this type of repair?

  19. My husband and I built an earth sheltered home in northwest Ohio using Nudura insulated concrete forms and Insuldeck forms in 2002. Now in 2020 I have leak in my kitchen where the steel I-beam that holds up the second floor of our home and the ICF forms intercept.
    1. Can Turbo Seal be used inside to stop a leak
    2. Do I need to dig down on the outside to find the leak – this would be a huge undertaking due to the amount of soil on the roof and then actually finding the leak since we know how water finds its’ easiest path and searching for the actual leak is like finding a needle in the haystack.
    3. Does Turbo Seal adhere to a wet area.

    Thank you
    Leah
    Ps I’ll give you our website just know that it has not been updated for many years…it does provide som important information though

    1. 1. You can never stop a leak from the inside except for steel where you can weld it. But to stop water coming through concrete cracks is almost impossible to do that from the inside.
      2. Turbo Poly Seal does not stick wet surfaces.
      3. If you send some pics to my phone number I might be able to help you better to come up with an idea as how to deal with this problem. Pictures from the outside to see what your house looks like and from the inside to see the concrete.

  20. My husband and I built an earth sheltered home in northwest Ohio using Nudura insulated concrete forms and Insuldeck forms in 2002. Now in 2020 I have leak in my kitchen where the steel I-beam that holds up the second floor of our home and the ICF forms intercept.
    1. Can Turbo Seal be used inside to stop a leak
    2. Do I need to dig down on the outside to find the leak – this would be a huge undertaking due to the amount of soil on the roof and then actually finding the leak since we know how water finds its’ easiest path and searching for the actual leak is like finding a needle in the haystack.
    3. Does Turbo Seal adhere to a wet area.

    Thank you
    Leah

  21. Hi there, I have to fix some leak on my barn roof. Weather being kind of wet lately, how dry have to be the surfaces before applying Turbo Poly ? Also the roof is mostly in metal but connect to a wooden one, do I have to remove all the rotten wood part before applying or I can just cover up ?

  22. I just purchased the half gallon of poly seal. After reading the safety data sheet I noticed there wasn’t any instructions on how to clean up equipment or how long it takes for poly seal to cure. It also says to follow the instructions on the container. There is no instructions on the container. In fact there is no label at all.

    1. Sorry to hear that. I am not sure why there was no label on the container. You use a disposable brush to apply the Turbo and if you have to clean something, you can use Laquer Thinners

    1. We used to carry it, but it cost us more in packaging than we would make on it so we had to go to 1/2 gallons

  23. I came across your product on YouTube. Watched a few videos and saw the same issues I’ve been experiencing. Bought a building with a metal roof. Roof has been coated twice with mop on aluminum coating. Leaks appeared to be coming from places that shouldn’t be leaking. I ordered the product and once it arrived i got to work.

    Followed the video instructions and exposed the metal on all seams including the ridge cap. Once the coating was removed I discovered most of my issue was in the ridge cap.

    I coated all seams with Turbo Poly Seal and got rain for the next 3 days. Not a drop of water to be found.

    100%would recommended this product and will use again.

  24. Hi,

    I have a large metal roof on an outbuilding with about a dozen or so leaking screws. Can I use this just as the poly coating or would you recommend doing the sheets as well? The screws were put in the wrong place and the only way to do it right would be to completely replace the roof, which I’m not willing to do. I’d like to coat the screw heads with this poly. What is your thought?

    1. Yes, no need to replace the panels. Just give a quick brush with a wire brush and dab every screw with the turbo Poly Seal. You can also dab the holes that were left by screws that were removed and close them up with the Turbo Poly Sea. You might not close the screw holes completely the 1st time around but may have to dab it a second time. Also, if the holes are too big to be sealed with dabbing, then cut a small piece of the fleece and cover the holes that way.

  25. Hello,
    All around my chimney i see small tiny cracks in the mortar. Can i apply the turbo poly sealant to the mortar?

    1. If the cracks are on the sidewalls of the chimney between the bricks or stone, I suggest using Alex Plus Clear caulking and smear it into the cracks with your finger. Turbo Poly Seal will; be good for the crown on top of the chimney and also where the flashing meets the chimney at the bottom. The transition between the metal and the mortar

  26. I have a sunroom with a white painted sloped aluminum roof that has been caulked between each of the panels. Over time the caulk has degraded and the roof now leaks. Three questions:
    1. Would Turbo Poly Seal be the correct product to address the leaks?
    2. I’m planning on removing/scraping the caulk where possible, but does all of the caulk have to be removed prior to applying the sealant?
    3. Any suggestions on a solvent to clean the surface prior to applying the sealant?

    1. The thing that concerns me is the “White Paint”. If you put any sealant over that paint it is as good as the paint itself. The paint can peel.
      If you feel that the paint is adhering very well, then I suggest Super Silicone Seal instead. It is white and more flexible than Turbo Poly Seal.
      You don’t need to remove all the caulking
      A steel brush is good enough to prep the surface.
      Don’t use solvents because it could lift the paint or make it weak.

  27. Name : Martin larret from Miami
    Question : Hello Nass
    I have a glass and aluminum roof with leaks.
    I am planning to seal the joints (Glass-metal) with the Turbo and fiberglass.
    May I paint with the Turbo the rest of the glass pieces?
    I prefer to paint the glass because the sun is very strong here, and my sunroof space is getting very hot inside…
    Thank you

    1. On the product page we recommend that you don’t use Turbo Poly Seal on glass or plexiglass. The best product to make the transition from metal to glass is Super Silicone Seal. Super Silicone Seal will adhere to glass much better with less preparations.

  28. Hi Naas,

    Any updates on shipping to Canada. I have a metal roof that needs repair desperately before winter comes. Now with covid I can’t drive across the border to a shipping depot and bring it over myself.

    Thanks!

  29. Can this be used for repairs of a spray foam roof? Will it stick to the top coating? And would it stick to tar repairs or do they need to be removed? Thanks in advance.

  30. Hi, any concerns with applying this product in cold temps? I live in Vermont and have some roof repairs to do but cold temps are here for the foreseeable future. Thanks.

  31. Hello. I’ve hot a gap about an inch wide between my metal roof and the metal chimney. Previous owner did an awful job sealing it.

    Will turbo poly seal be able to seal this gap, or do I need to try and use something else to fill the gap before using turbo poly seal? If I need to use something else to fill the gap first, what should I use?
    Thank you!

    1. Sorry for the late response. I must have overlooked your Question. It is possible to use the Turbo Poly Seal with the fleece to breach the gap off appro. 1 inch. I suggest applying 1 coat with fleece, then come back and do a second run with fleece. That will be super strong.Then after it has cured, apply 1 coat of Silver Coat protection. That way the UV’s won’t harm it.

Leave a Comment

Your email address will not be published. Required fields are marked *

This site uses Akismet to reduce spam. Learn how your comment data is processed.